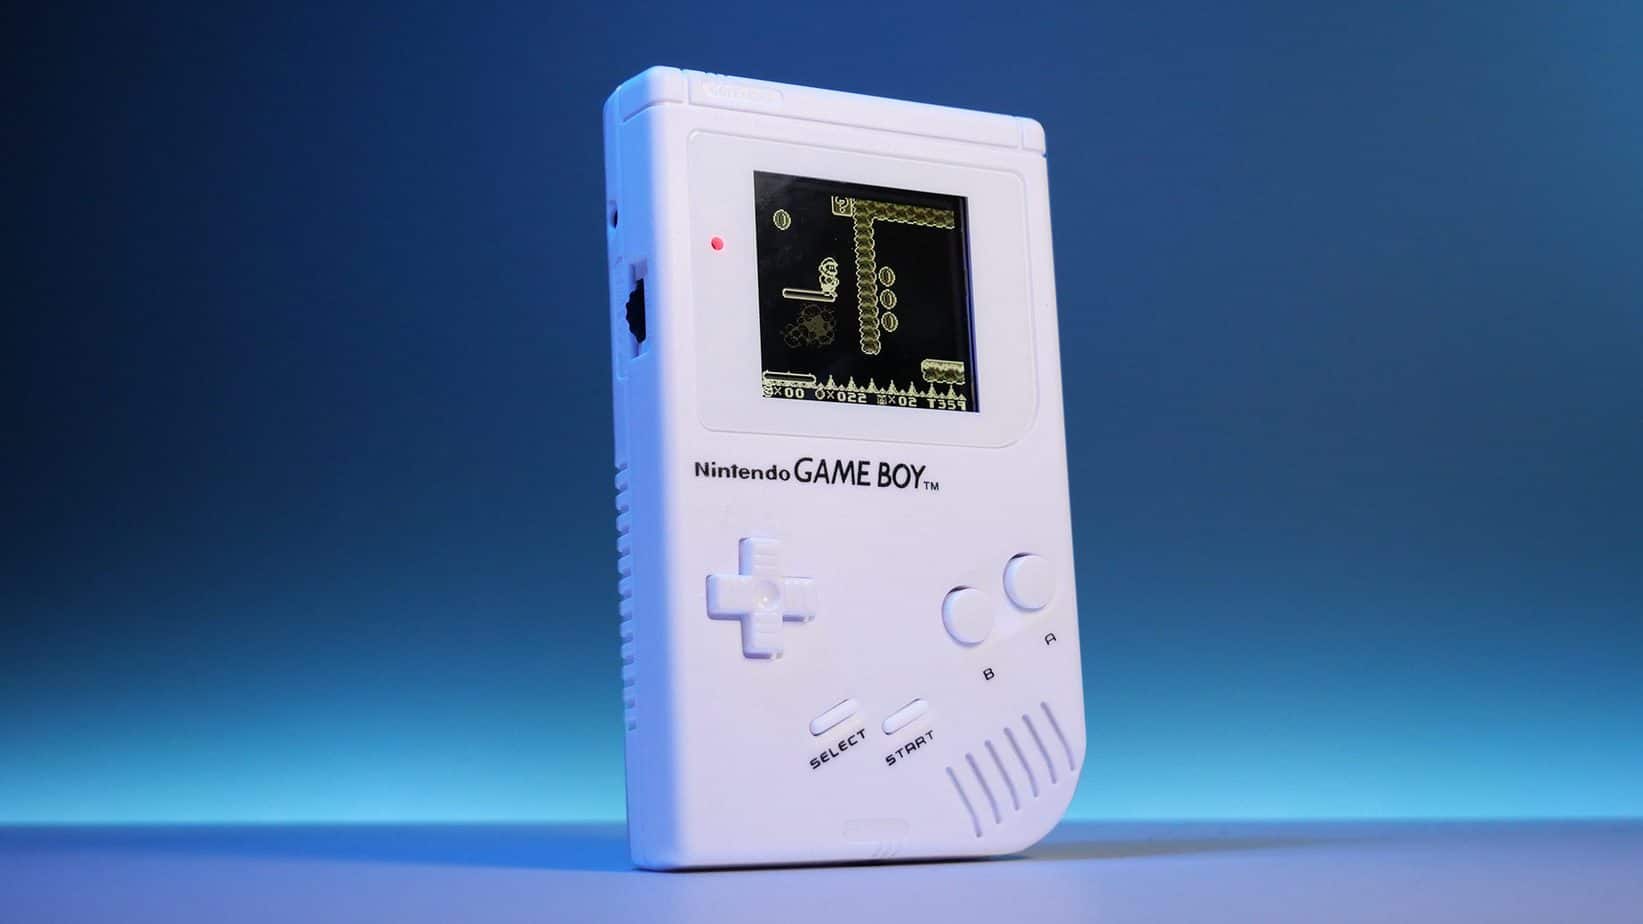
The iconic Gameboy DMG is by far our favourite console of all time and one of the most commonly modded retro gaming handhelds, not only because of its simplicity to do so but because it’s genuinely a great handheld to play games on still to this day.
You may be like most who have found an old original Gameboy and want to turn it into a modern masterpiece, or you may have the urge to go out and buy one purely to modify. It’s great fun, it reinvents your beloved handheld and it means you can now play your favourite games in the most organic way possible, and you can read all about our favourites right here!
Before we jump into what you need and how to do it, we can’t stress enough that this isn’t going to be a cheap project. Many think you can modify a Gameboy for a few bucks, you technically can, but we want it to be a modern build that not only looks great, but performs great too.
We recommend putting aside $100+ to modify a Gameboy, that’s if you want a new shell, backlit screen, new buttons etc. Let’s get started! This is how to modify your Game oy.
Table of Contents
1. Get The Correct Tools & Equipment
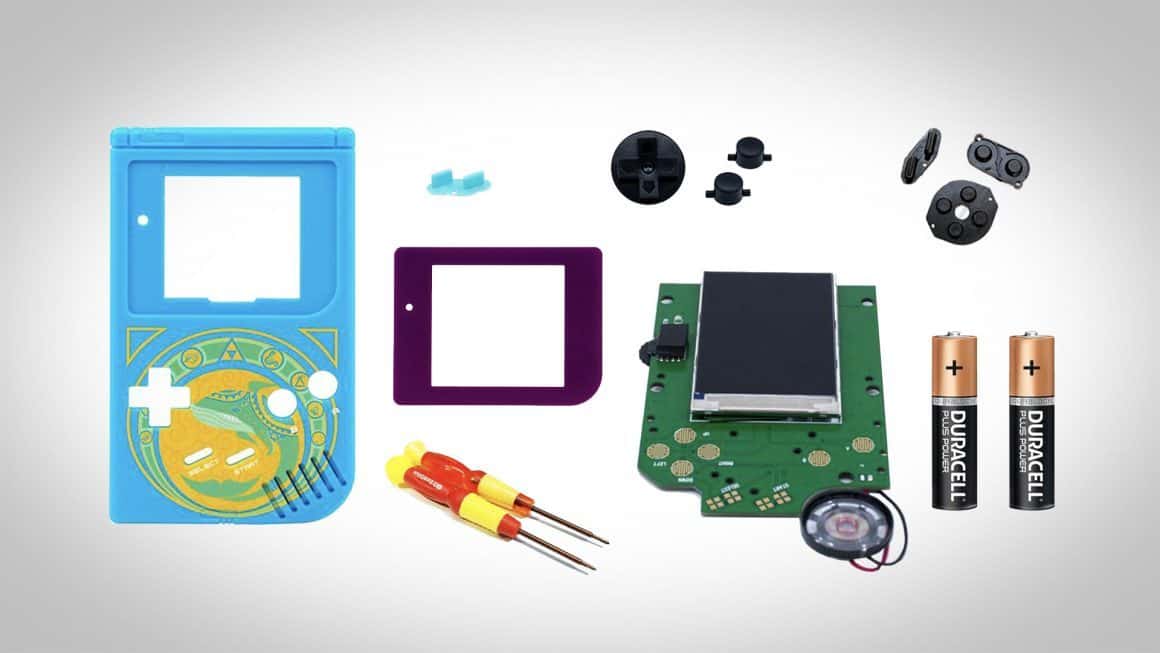
You will need a few things before you can get started, some you may already have, but we’re going to go through this process thinking that you have nothing, so it helps each and every one of you. You can get all of these from a wide number of websites, but we’re linking to ones we trust and have personally used. We are also predicting that you have an old original Gameboy, if you don’t you’ll want to grab one before reading this. You will need the following (click for links):
- Tri Wing & Cross Wing Screwdriver – $5
- 2 x AA Batteries – $5
- Custom Gameboy Shell (You can use your old one, but we don’t advise it). $12 – $50
- Gameboy IPS LCD “Drop In” Display – $89.99
- Fresh New Buttons – $2.99
- Fresh New Glass Display – $5
- Start/Select Silicone Pads – $3
Once you have all of the above, you are ready to start putting together your brand-new modified Gameboy. You will need the two screwdrivers, because one will get you into the shell, and the other will take the motherboard off the shell, allowing you to get to the buttons and screen. Many of you will want a new shell, and we can’t recommend it enough, many of us have very sun-damaged consoles (when your Gameboy turns yellow) so putting on a new shell feels and looks great. You can get them from websites, Etsy, eBay, or even do them yourself if you have an artistic touch. Custom ones with art or printing on them will cost up to $50, and plain or transparent shells can cost as little as $10. All shells you buy will come with a battery door.
The IPS LCD display that we recommend is a little pricey, but this is for good reason. This drop-in display is for those of you who don’t want to do any soldering. Most of us, who ask ourselves “how to modify your gameboy” don’t want to spend money on a soldering kit just for this build, so having a display that you can simply drop in makes it quicker, and has less chance of destroying your Gameboy. This is also the newest display we have seen, older “drop-in” displays, and backlit displays require a lot more work and some have greyscale issues. This display is highly recommended as it is incredibly bright, easy to install, and has 4x the pixel density making games look very sharp without taking away from the pixelated look. Just make sure you order the “pre-built” version.
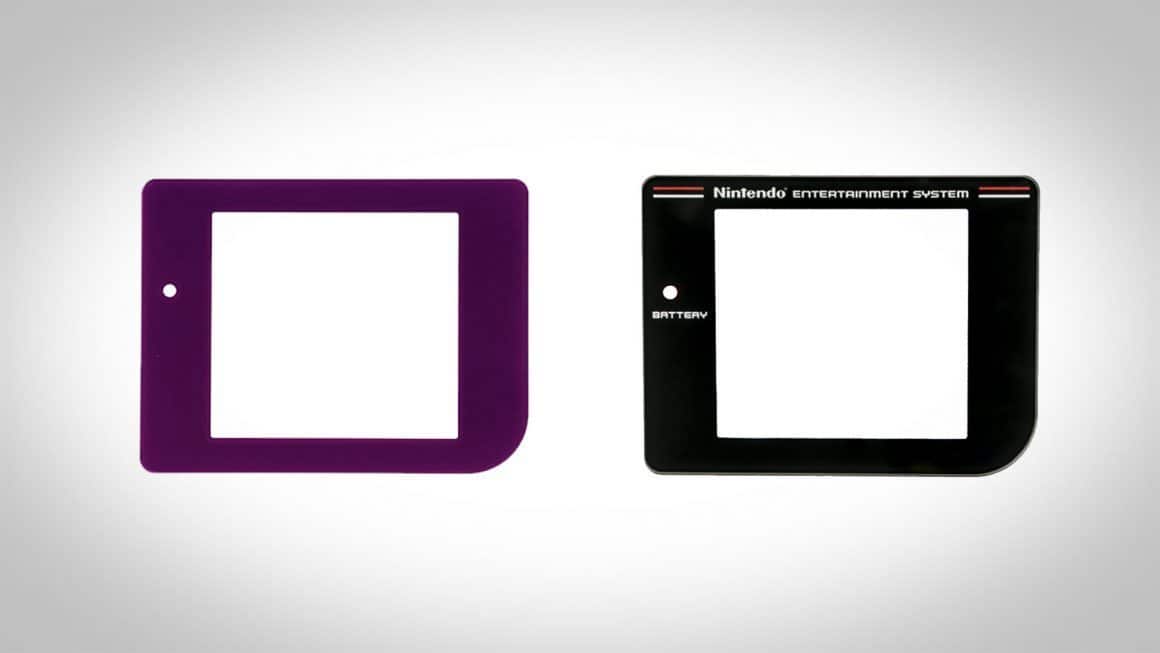
And obviously, new buttons and a new display is recommended to make your Gameboy feel and look new. You may notice the original Gameboy comes with a plastic display, correct. But because it’s 2020, why not go with a modern glass display. This feels much better and makes it slightly clearer to see your games.
2. Take Apart Your Gameboy Shell
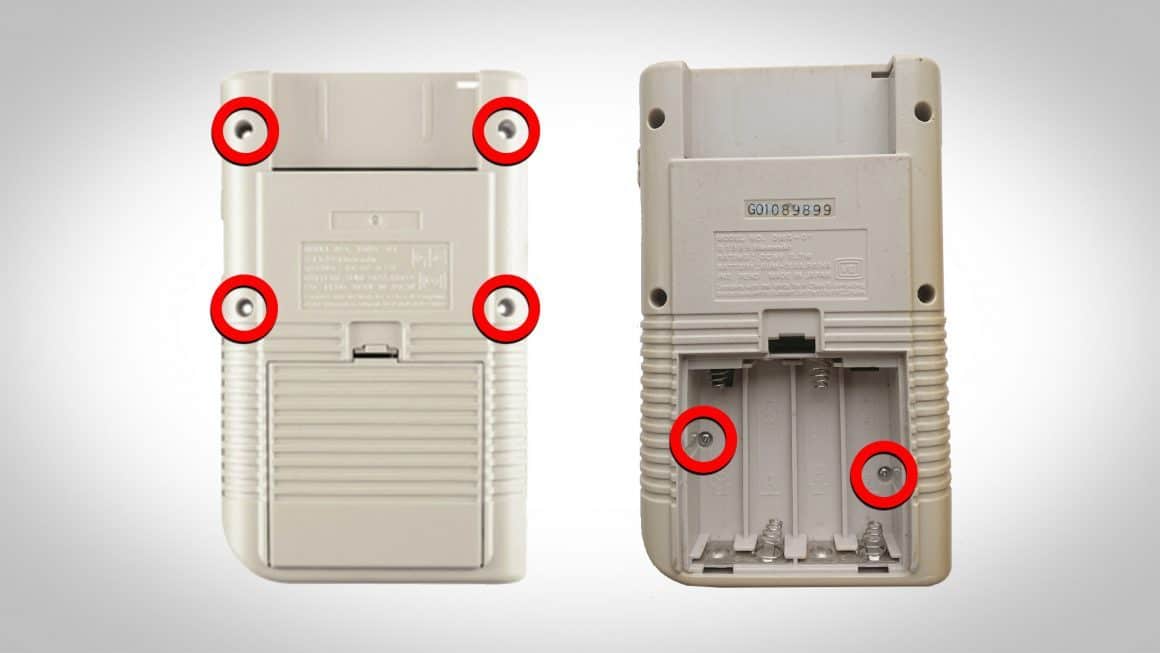
Pick up your tri-wing screwdriver and take out all of the 6 back screws. 4 of them are on the back, and 2 of them are in the battery compartment, under the batteries. Once all the screws are removed, place them somewhere you remember, because you will need to put them back in order. Then pull off the back shell and you will be greeted with the motherboard. BUT, you will notice the screen ribbon cable is still connected, simply give it a couple of tugs, and it should come loose.
For those of you who have never done this before, once you open the back your initial response will most likely be “What the heck am I looking at?”. Do not fear, it’s quite simple, and there isn’t really much to do, a few simple steps and you’ll be playing on your new Gameboy in no time.
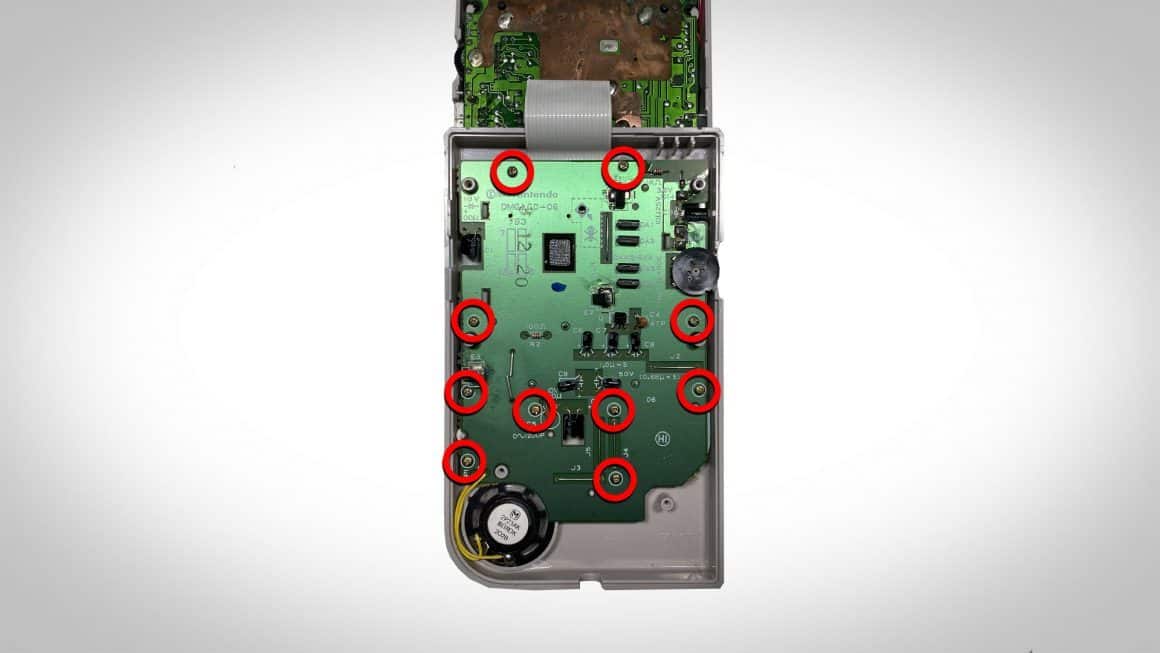
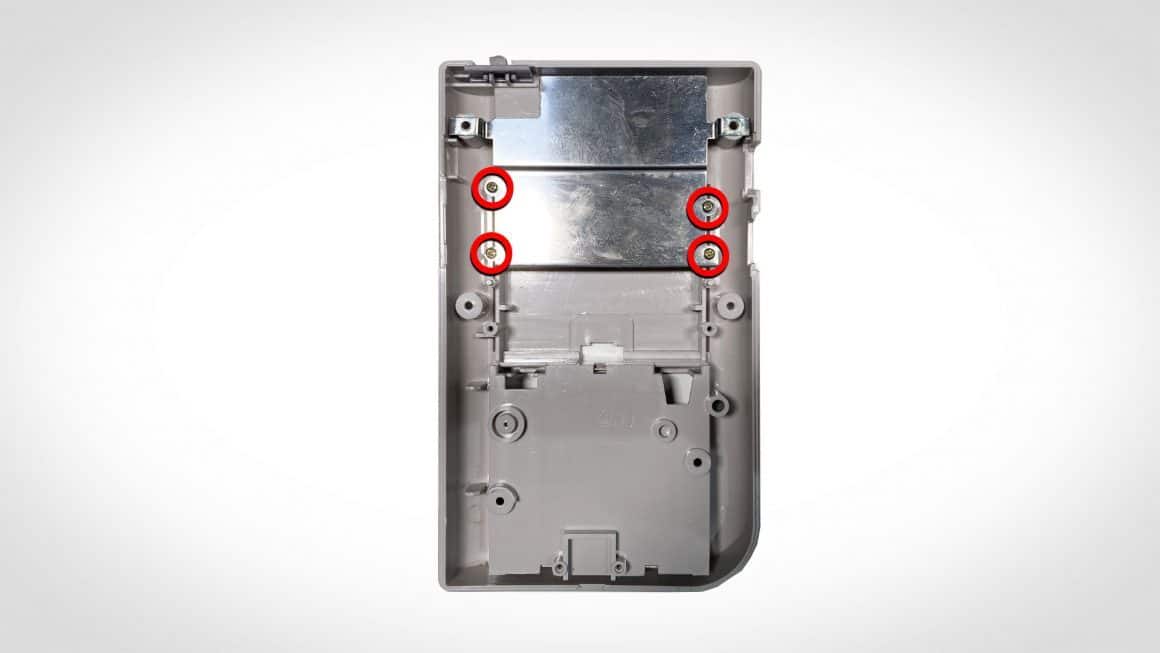
Now, look at the image above that we have created and it will indicate what screws to take out in order to remove the motherboard from the front shell. This is where you switch to the Phillips screwdriver. There is in total 10 screws to take out.
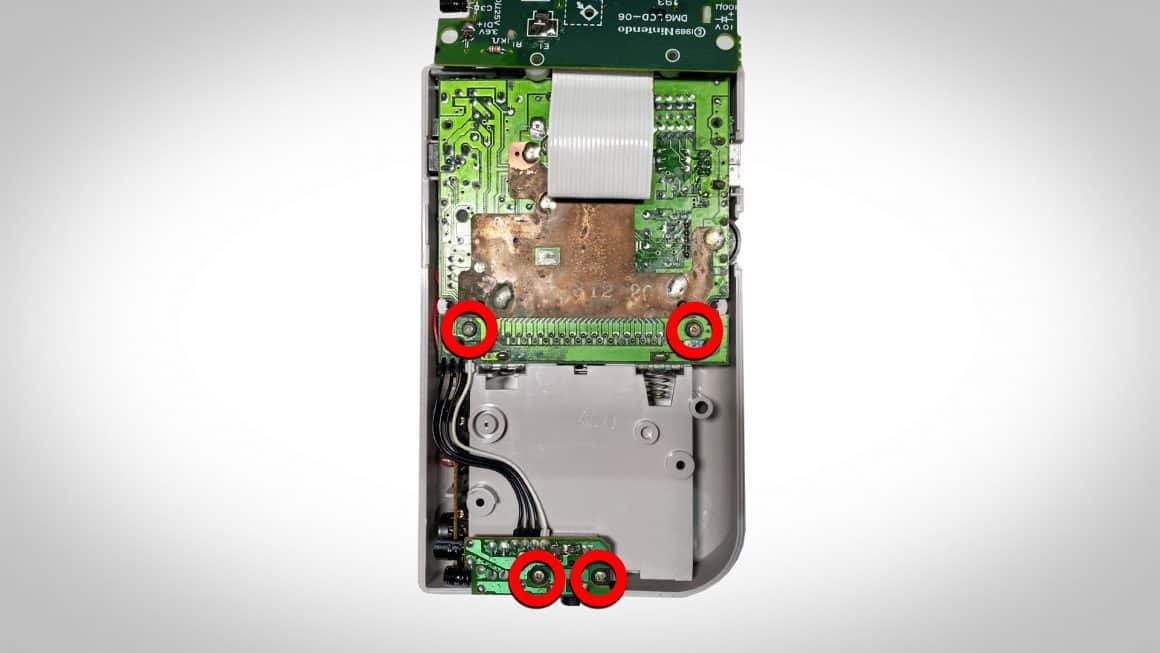
Once your screws have been removed, lift off the motherboard from the front plate and place it on the other half of your Gameboy. Then do the same with the back plate; you will see which screws too unscrew in the image below.
Don’t forget to put your screws where you will remember them. By now, you should have put your screws aside in sections. Exterior, Interior Front, Interior Back, because thats the way you took them out, and it’s a mandatory step on how to modify your Gameboy.
3. Clean Your Motherboard
For those of you that have noticed that the interior of your Gameboy is dirty, and rusty, you may need to clean it. Cleaning your internals is a great way to prolong the life of your Gameboy, simply removing rust with a cotton bud and some alcohol is an easy and effective way to clean your handheld. You can even pick up affordable electronics cleaning kits for a few bucks here that can help. We will still need to use the back half of your motherboard, to power everything, so this is what you will need to clean. Compressed air, will also help.
If you’re experienced with soldering you may want to re-solder some sections that are loose, but that’s only if you have experience and know what needs doing. A very, very small amount of you will need to do this. The Gameboy is a reliable piece of electronics, and even the oldest units can be working perfectly to this date. Also, finally, don’t forget to clean your silicone pads if you’re using them within this build.
4. Prepare Your New Shell
Your first step is to add your new glass display to your new front shell. It shouldn’t have one, but if it already does, remove it by pushing it off the shell. Get your new glass display, reveal the sticky base of the sticker, and place it on your new shell. This part alone is so therapeutic, and it’s the first time you see your old handheld coming back to life.
Next, place your shell upside down, and start inserting your new buttons into the shell. Some of you may have purchased new silicon pads which we also recommend, so add them on top of the buttons. Your old ones are fine, just remember to clean them.
You will see small holes in the silicone, which you will need to hook around small “pins” in the shell, this keeps it all in place. Don’t forget to add your start/select buttons too.
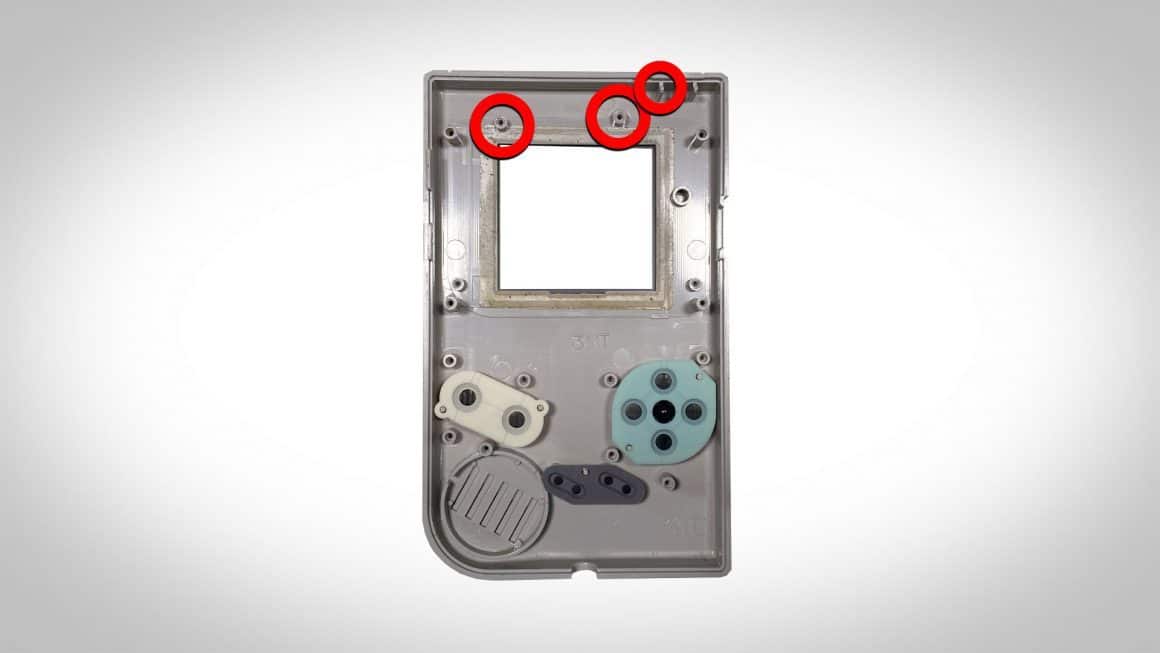
The image above is what your new faceplate should look like, ready for your motherboard to be placed. The final thing to do is to clip away two screw points. This is because the new display’s motherboard has to fit in differently as it’s slightly longer.
In the image above, clip off and then sand down the circled screw points at the top of the shell. You may have to clip one of the 3 “lines” in the top right corner too. All we need to do now is to insert the new drop-in display onto your shell.
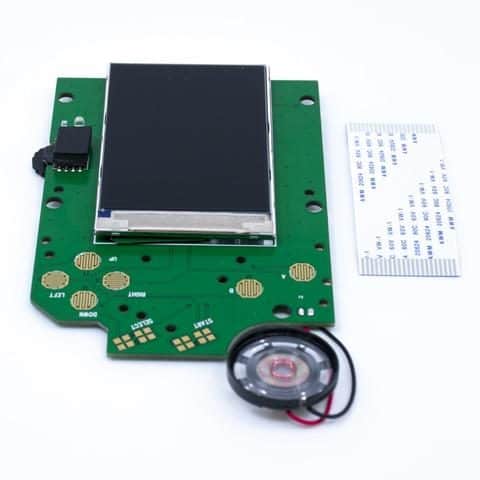
5. Add Your New Display
This is the easy part, for many “old modifications” and those doing it the cheaper, longer way this would usually be a lot of work. But for you, because you’re smart and purchased a drop-in kit, you simply… drop it in. First, remove the screen protector on your new IPS display. If there’s any dust or dirt, simply remove it with compressed air.
Face your display down, and place it around the screw points correctly, it should sit nicely within the shell but you might need a few try’s to get everything in place.
Most of the time it’s the speaker that gets caught, but make sure your buttons are in the right way, the silicone pads are secured, and the two screw points have been clipped flush with the shell.
6. Install The Old Cart Shield
A very simple step, and one we have forgotten to do on a number of occasions and that’s to switch your cart shield over to your new shell.
Simply unscrew where the screws are in the above image, pull over your new back shell, and place it in the exact same location. Do not screw in the top corners, this is where your outer shell screws go!
7. Connect Your Internals
As mentioned before you will need to connect your new drop-in display with your old motherboard, which will connect to your batteries to power your Gameboy. Hopefully, you have also cleaned it by this point.
Remove the two old motherboards by disconnecting the ribbon cable if you haven’t already. Just give it a good pull and you should have them separated.
Then you can use the back half of the motherboard to connect to your new back shell. Don’t forget the two screws near the headphone jack, we’ve missed them before and it’s a pain in the butt to do it once you’ve sealed it all up.
Once your back shell is connected you should be holding both halves of your Gameboy. All you have do now is connect the ribbon cable.
You will need to give this a good push, and most likely use both of your hands. Just make sure you have hold of it tight, ribbon cables can rip, so always push forward, and never wiggle it. Once it is connected, connect the shells together and place in the final set of screws, starting with the inside of the battery cover.
8. Add Batteries & Play
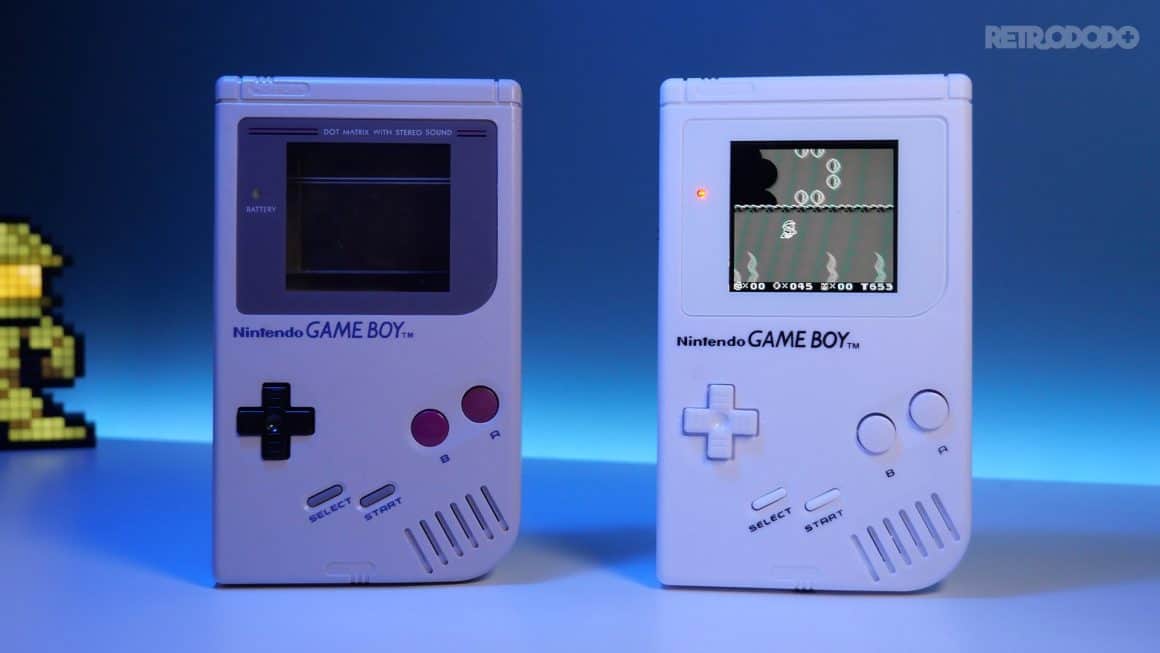
Finally, add your batteries, turn it on, and you’re ready to play your Gameboy games on a fresh new modified Gameboy.
This modification is special because you can set different back-lit colours by pressing the contrast button on the side. If you want red, you can have red, if you want green, you have green. Meaning you can keep it to your shell’s colour scheme!
When you asked yourself “how to modify your Gameboy”, did you think it would be this easy? Not only was it easy, it’s incredibly therapeutic too, right? It’s a satisfying thing to do, and it was the Gameboy that started our love for modifications.
This is the best time to do it too, as more and more game enthusiasts start modding their beloved Gameboy, unfortunately, it means the prices of them goes up. Where this is good for collectors, it’s not so good for us geeks who want to actually play on these things.
If all of that was a bit too much but you still want to play your Gameboy games and even the Neo Geo titles on the go, then we recommend taking a look at the Bittboy Pocket Go V2. It’s a $50 handheld that can emulate most of your old-school games, and it not only looks great, but it performs great too!
So there you have it, the ultimate guide on how to modify your Gameboy properly, if you have any questions feel free to hit us up on Twitter, we’d be more than happy to talk you through your mods @retro_dodo! Also, be sure to check out our full handheld collection video below!