


There are so many options out there to upscale your retro game consoles in order to make them look better on modern TVs. You can use something like a Framemeister, RetroTink or OSSC, for instance, and the results can be stunning.
The thing that all of these upscalers have in common, however, is that they’re aimed at consoles that don’t already have HDMI video output.
This leaves a bit of a gap in the market considering that systems like the PS3, Xbox 360 and even the Nintendo Switch are starting to show their age and could benefit from the same type of upscaling we’re seeing with those retro systems.
This is where the mClassic HDMI upscaler comes in, created by a company called Marseille and kindly sent to us for the purposes of this review. This is an upscaler which converts a HDMI signal and (at least according to the box) adds a depth of field effect, anti-aliasing, and sharpens the image.
And of course, it upscales the resolution of whatever console you’re using.
On top of all of this, it adds no noticeable lag, which in theory makes it the ultimate device for improving your experience with these slightly older systems.
You’re getting all of this in a tiny almost USB sized device which costs approximately £100 in the UK or $100 in the US. This might seem a little bit expensive, but if it improves the quality of your consoles as much as it makes out on the box, then this could be a game changer.
Taking A Closer Look At The mClassic HDMI Upscaler
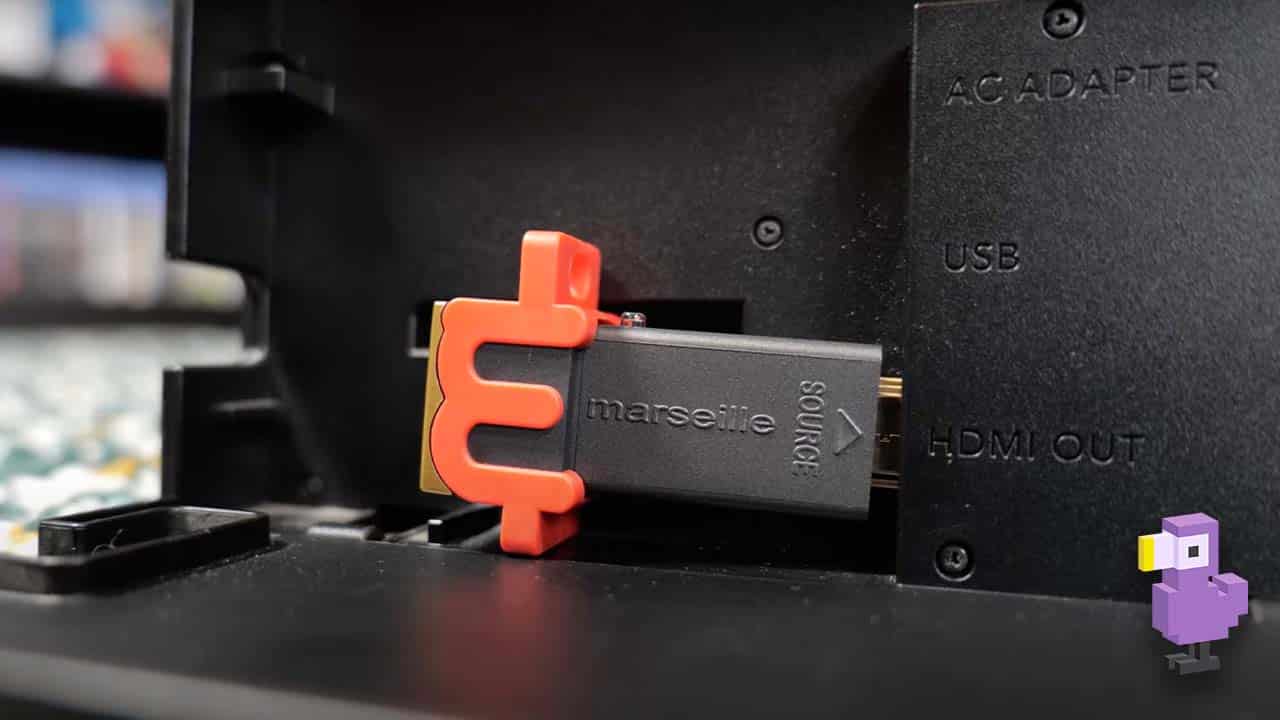
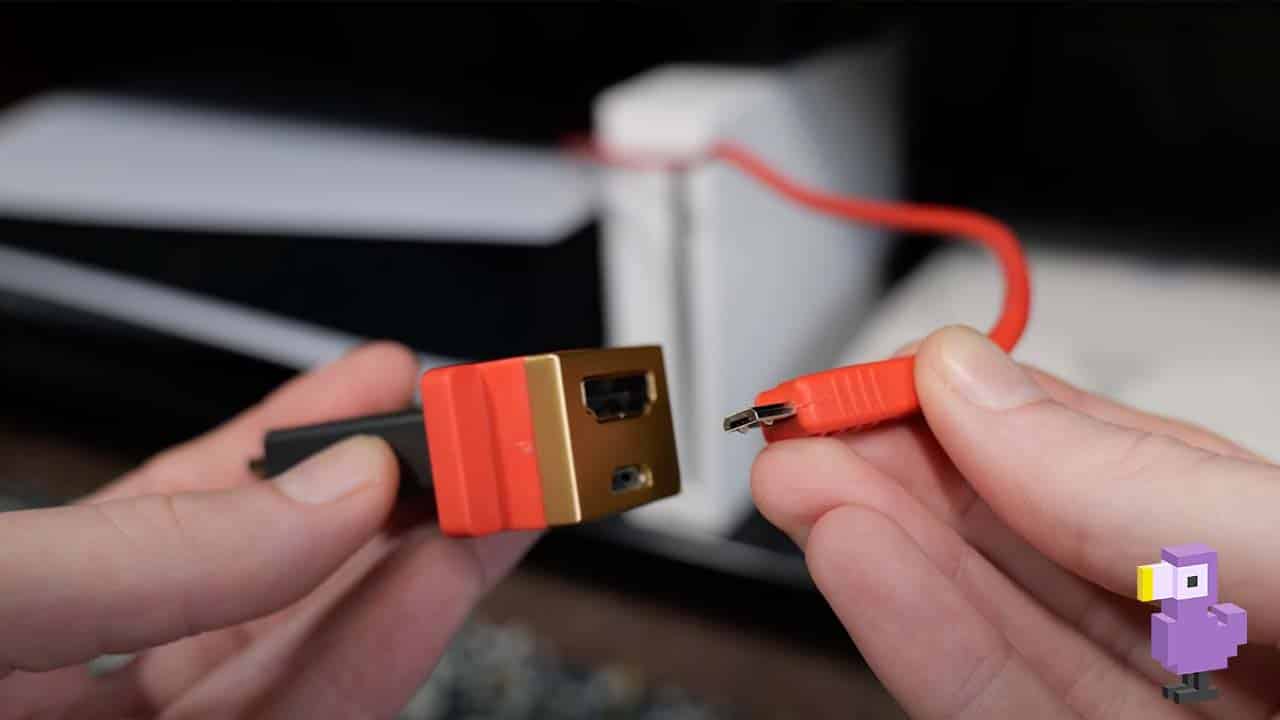
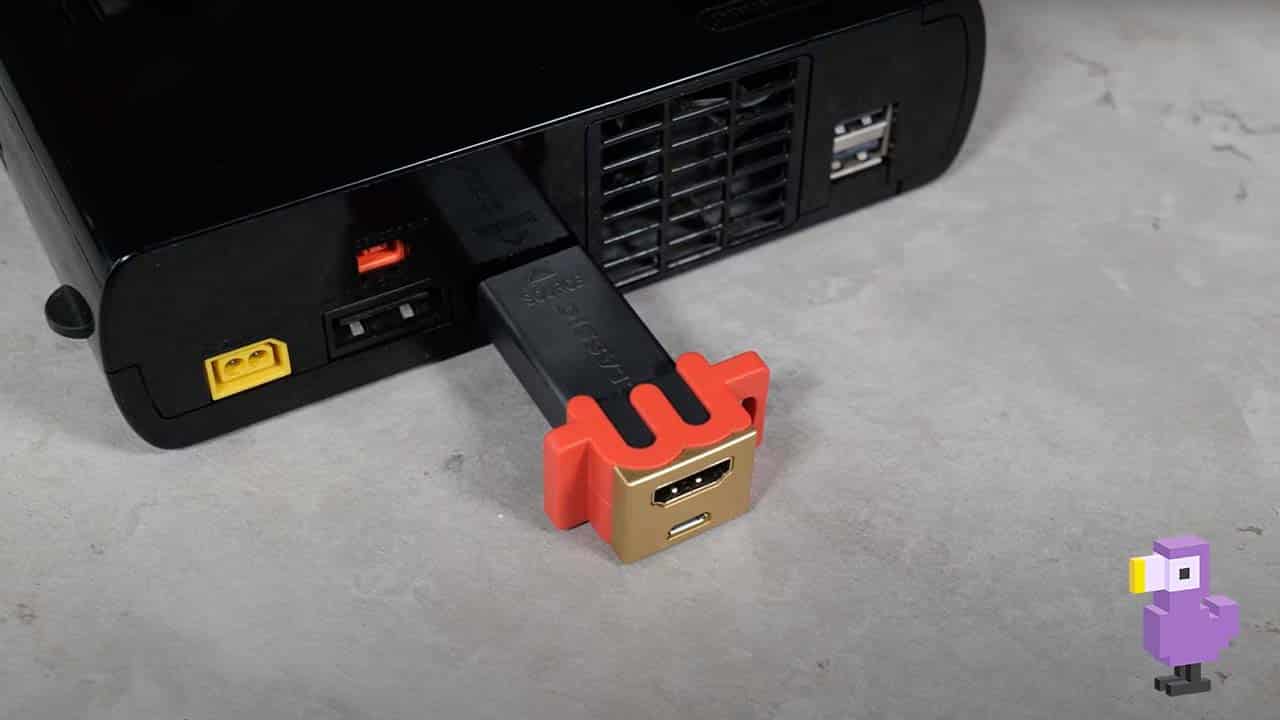
The mClassic plugs straight into the HDMI port of whatever console you’re using, then allows you to plug a standard HDMI cable into the other end in order to send the video to your display.
It does need to be powered by a micro USB cable (which is included with the product) but after setting everything up, it just works! There’s no tinkering with menus or complex settings to navigate, it’s all pretty straight forward.
One minor thing to look out for is that because the device is quite wide, you can’t plug it into the Switch dock directly because the plastic shell makes it slightly too wide to fit comfortably. Luckily the mClassic HDMI upscaler comes with this little HDMI extension which I assume has been provided for this exact purpose, so this isn’t an issue at all.
The Three Upscaling Settings
The only other thing you might want to mess around with is the switch on the side of the device which has three different positions.
The first option is simply deactivating the upscaler completely and using it as a passthrough, effectively using your console’s video output as it was intended with none of the features of the mClassic.
The second option turns on a green light and this is called the ‘Processing On’ mode. This is basically the default setting you’re going to want to use in most cases, with it turning on the upscaling and additional features to improve the image coming from your console.
Then the third and final option is the ‘Retro Mode’, turning on a blue light on the device and as far as I can tell this is exactly the same as the ‘Processing On’ mode but forces the image to be a 4:3 aspect ratio. That’s pretty handy if you’re using this with a retro console and your TV doesn’t have the option to natively display 4:3.
That’s pretty much all there is to it; it’s an extremely simple setup process and, once it’s plugged in, turned on and in its default processing mode, you theoretically wouldn’t need to touch it ever again.
But let’s get into the reason you’re all here. You’re hungry for some footage comparisons aren’t you? Well then, let’s dive in to some gameplay!
mClassic Gameplay Footage Comparisons
On the mClassic website, the vast majority of the footage comparisons they use are coming from some of the best Nintendo Switch games, which makes me assume that this has been made with that particular system as its primary focus.
For that reason, I think it makes sense to start there and show you some comparisons between the mClassic footage and some raw unaltered footage, all being recorded by an AVerMedia Live Gamer 4K capture card and through OBS Studio as the capture software.
To begin with I’m keeping things simple and setting the Switch to output at 1080p which is it’s maximum resolution.
Mario Odyssey
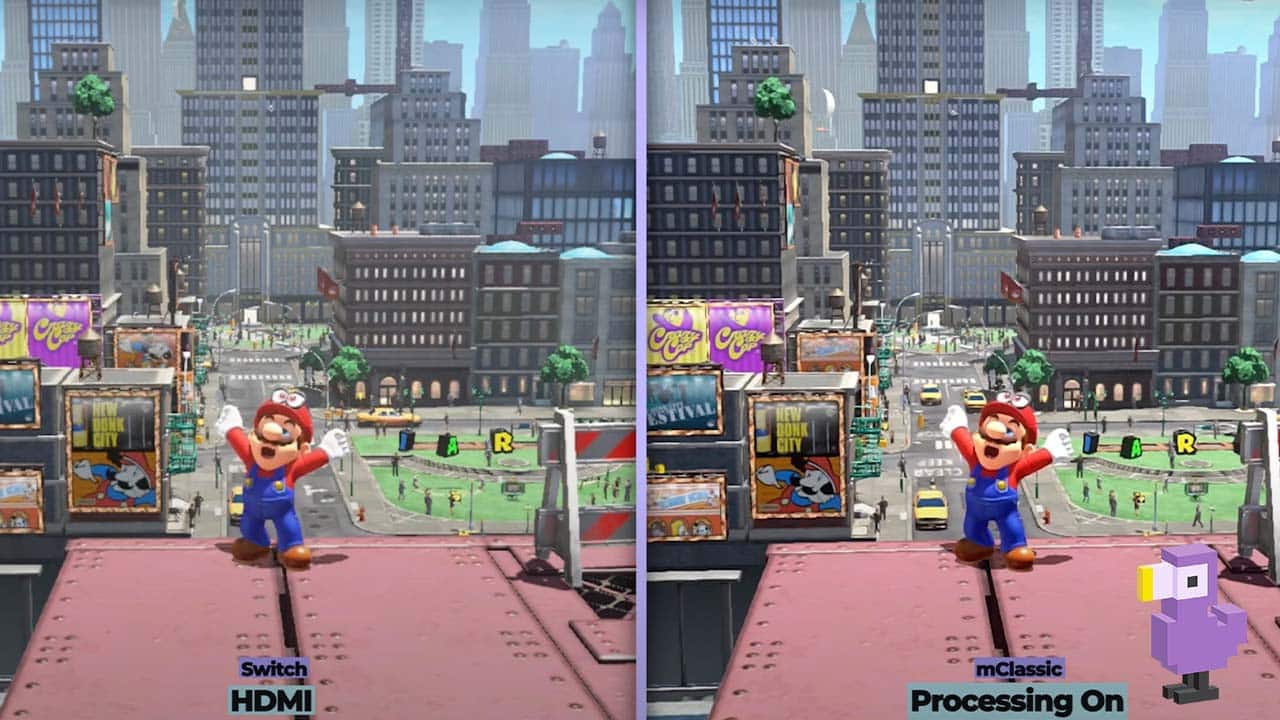
Let’s look at some side by side footage of Super Mario Odyssey because I think that showcases the difference a lot better. So on the left we have the Nintendo Switch video in it’s raw form and on the right is the mClassic footage.
Mario looks a lot sharper on the right whereas on the left he almost looks slightly out of focus. The colours appear to be slightly more vibrant from the mClassic too, and if we zoom in a little bit, we can pick up on even more minor differences. The anti-aliasing effect of the mClassic is clearly making things look less jagged.
Moving over to some gameplay with more motion and you can still see a huge difference. It’s like there’s more contrast and saturation from the mClassic and the sharper image allows you to pick up on more detail in the environment.
Mario Kart 8 Deluxe
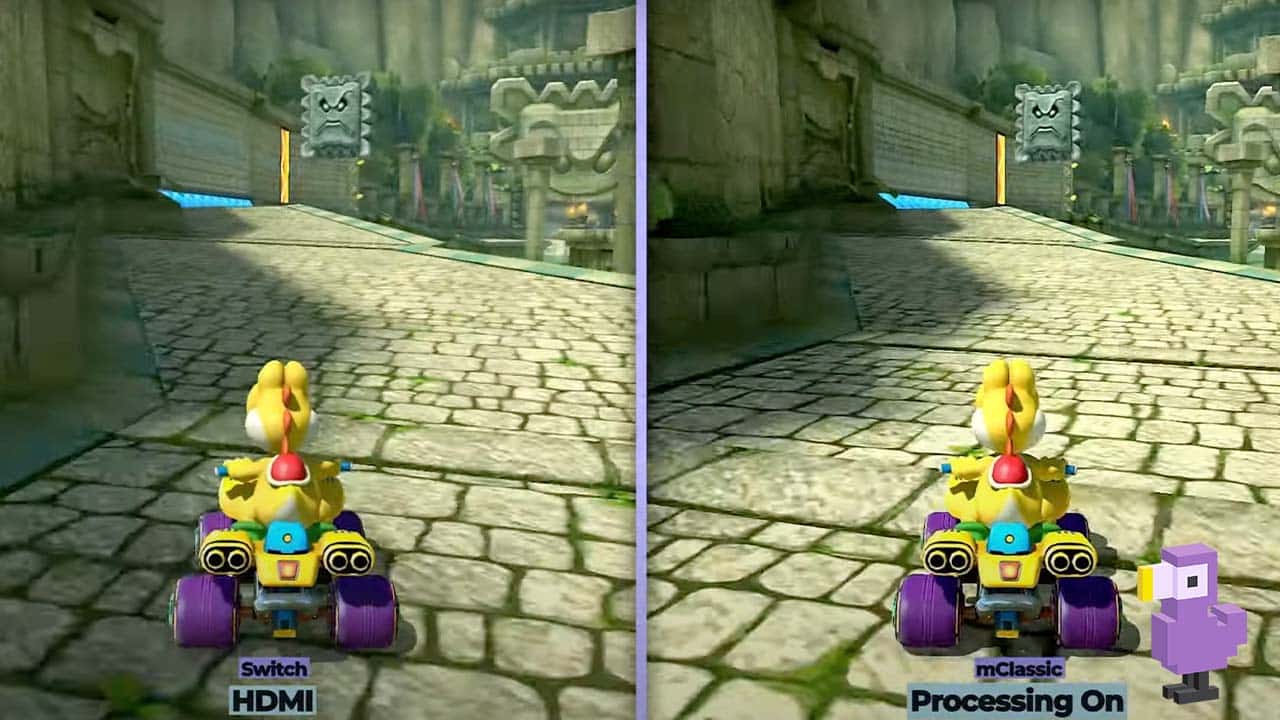
Mario Kart 8 Deluxe is already a gorgeous looking game. Probably to this day it still has the best graphics I’ve seen in a Switch game, so what can the mClassic do here?
Well I will admit, the difference here isn’t actually all that noticeable. If you really look closely you can tell that the mClassic image is a bit more vibrant but the difference with this particular game is negligible. An interesting thing I noticed is that on the loading screen, the mClassic actually blows the image out to such an extent that you can’t see the pattern in the background, whereas if we swap to the raw image, it looks fine.
So wait a minute… Why is it that we’re getting different results depending on the game we’re playing?
How Does The mClassic Handle Resolutions?
Well, I think this has something to do with how the mClassic handles different resolutions. When in docked mode, Super Mario Odyssey has a dynamic resolution which can change from 1600 x 900 all the way down to 1280 x 720, but sits mostly around the 1440 x 810 area. I know I’m spouting a load of numbers at you here but stay with me.
Mario Kart 8 Deluxe meanwhile has a consistent resolution of 1080p when docked, which means that the mClassic isn’t upscaling the image at all and this is why the Mario Kart 8 Deluxe footage looks much less impressive than the Super Mario Odyssey footage.
Now, the mClassic is technically capable of upscaling beyond 1080p. It can output a 1440p and even 4k signal, but these come with a few massive caveats.
Firstly, the 4k signal is locked to 30fps which decreases it’s usefulness considering that most games will run at 60fps nowadays.
Secondly, the 1440p signal doesn’t work unless the display you’re using supports a 2160 x 1440 resolution specifically. Even if your display supports 4K, if it doesn’t support 1440p, the mClassic won’t output that higher resolution.
One solution to this is to purchase an additional device which can trick your display into receiving and displaying a 1440p signal like this cheap HDMI adapter on AliExpress. But for the purposes of this video, I’m sticking to using the mClassic as it is with no extra devices attached as that’s probably the experience most people are going to have with it.
Can The mClassic Improve On The Switch’s Default 1080p Resolution?
But this got me wondering, what would happen if we went into the Switch settings and set the resolution to 720p in order to use the mClassic to upscale the image to 1080p? Would it look better than the default 1080p from the Switch itself?
I had a look at the raw 720p video coming from the Switch and then swap over to the 720p mClassic upscaled footage. The difference here is night and day which is great because it proves that the mClassic is in fact upgrading the image significantly.
Then I got rid of the raw 720p footage and replaced it with the raw 1080p footage, and the 720p mClassic footage was actually better than the raw 1080p footage. This implies that the mClassic definitely prefers a lower resolution signal to clean it up and rescale it to 1080p rather than taking a pure 1080p signal where it can’t do as much with it.
Basically, unless you have a display which is capable of accepting a 1440p resolution, the mClassic can only really show what it’s capable of with a resolution that’s lower than 1080p. This is perfect for the Switch because a lot of games don’t run at that full HD resolution. So let’s have a look at one more game with The Legend of Zelda: Tears of the Kingdom.
Testing The mClassic With The Legend Of Zelda: The Tears Of The Kingdom
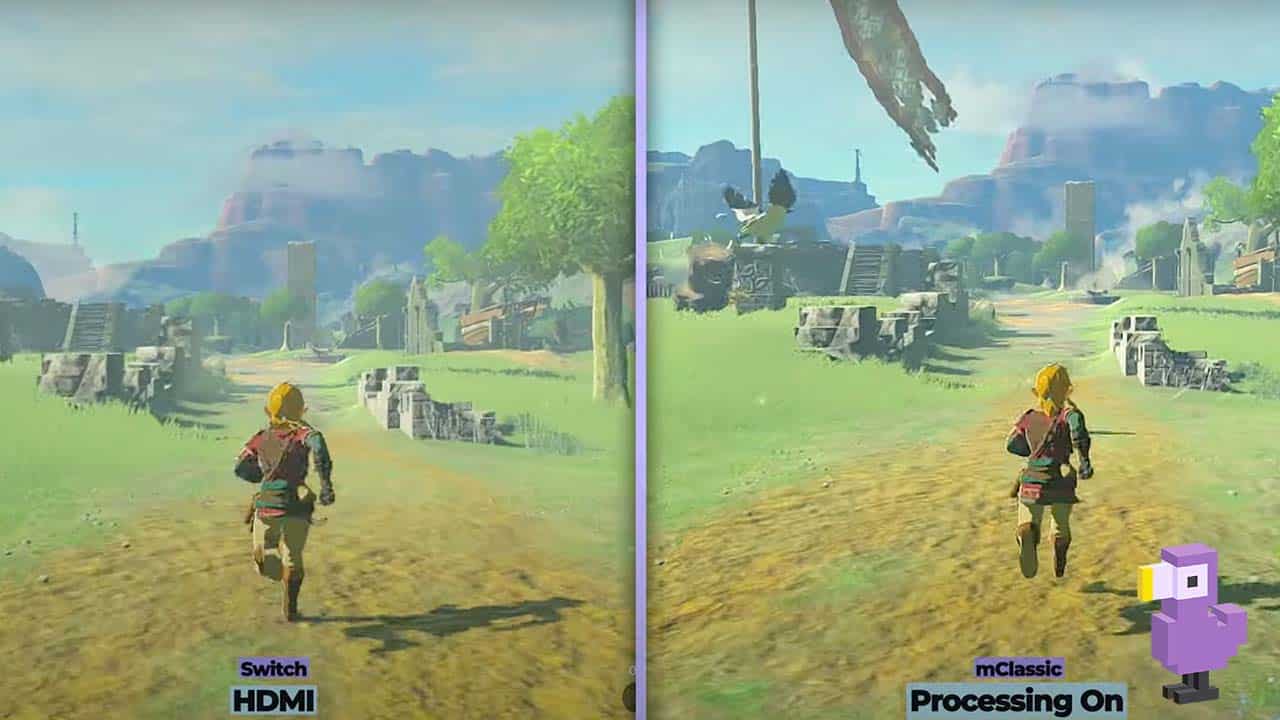
So, this game runs at a resolution of 1600 x 900, meaning that the mClassic will take that and upscale it very slightly to1080p. for this test it made sense to leave the Switch itself at a resolution of 1080p seeing as the native resolution of the game sits between 720p and 1080p, and we don’t need the mClassic to be upscaling from a lower resolution than what’s necessary.
So here’s the game at running normally in it’s raw form with no upscaling, and here it is running with the mClassic upscaling. This is a pretty major upgrade; Link looks so much more in focus here and even the background elements have so much more clarity.
Obviously there is a chance that you’re looking at this and you’re thinking, “sure I can see a slight difference, but it’s so minimal that it doesn’t really matter” and yeah I definitely get where you’re coming from. Let’s face it; the mClassic isn’t a miracle worker. It’s not going to make Switch games look like they’ve been ported to the PS5.
This is a product aimed at enthusiasts who want the absolute best picture quality they possibly can and for that type of person, I think this could be a product worth investing in.
But, before I go in too hard with the recommendation, I do want to do a few quick tests of some other consoles that you might find interesting.
Testing the mClassic With the PS3, Xbox 360, and Wii-U
In theory, the PS3 and Xbox 360 would both be prime candidates for the mClassic. Both of them use HDMI as their primary video output and both of them mostly feature games that run at 720p and while the mClassic doesn’t specifically state it works with these consoles, I’m still interested to take a look.
PS3
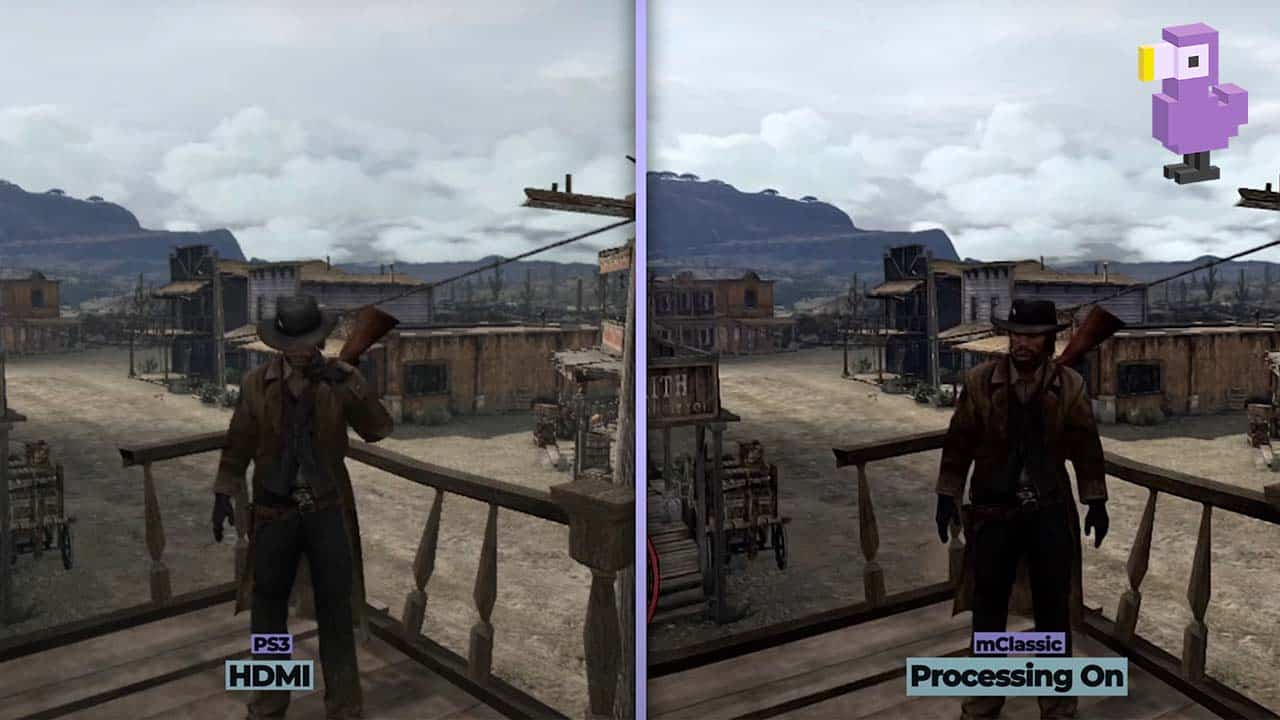
Starting with the PS3 let’s take a look at Red Dead Redemption. I’m actually not all that impressed with the quality we’re getting here and it’s not really down to the actual upscaling but the fact that the mClassic is making things too dark. This isn’t too noticeable in the outdoor areas but if I go inside, the mClassic makes this so dark that it’s taking away from the experience and you’d be better off playing without it.
Now, weirdly throughout my testing of the PS3 with other games, I never encountered this darkness issue to this extent ever again. This could be a very contextual issue which has something to do with Red Dead Redemption specifically but it is definitely something to consider if you were planning on using this with the PS3.
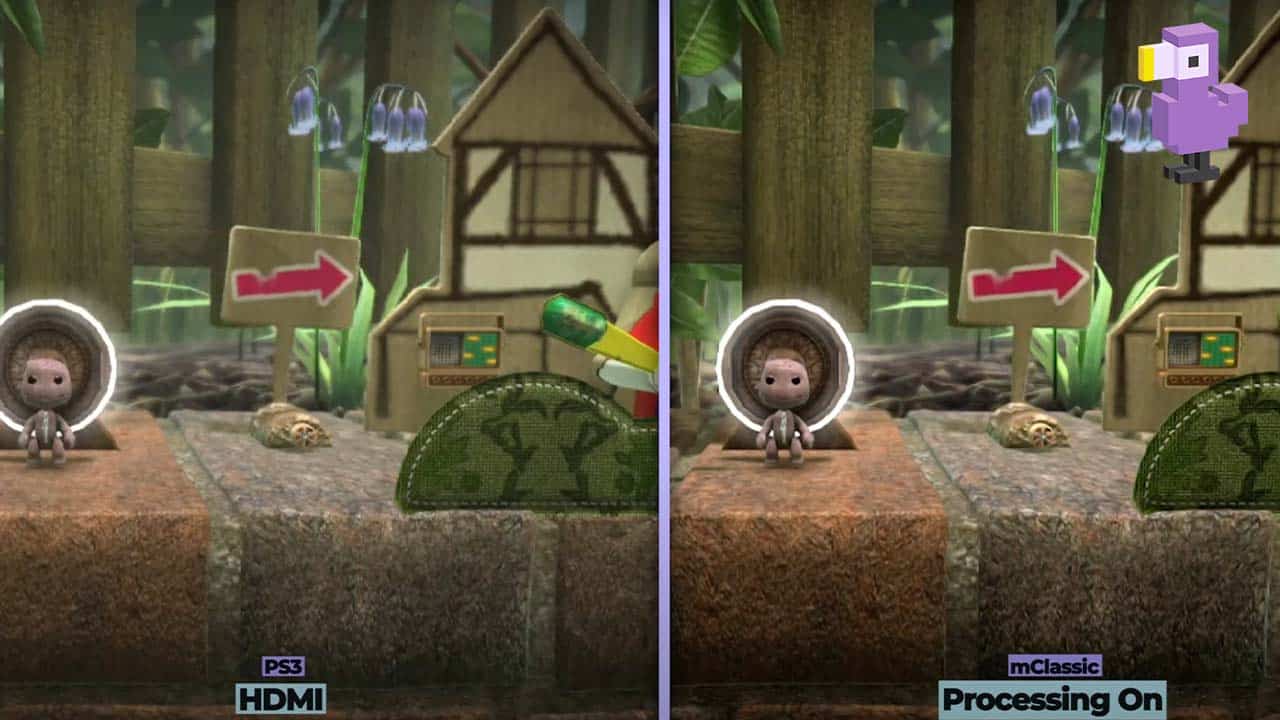
I then decided to move over to LittleBigPlanet and this is where the mClassic started to work it’s magic. The image produced by the mClassic is much better. You can make out more detail in the textures, things in the distance look more clear and everything just pops a little bit more.
Journey was another game which I would probably say looked better with the mClassic. It’s subtle, but it does look a bit sharper and it almost looks a little bit more dynamic with the colours being slightly more vibrant.
So it seems that the improvements you’re going to get from the PS3 will be fairly inconsistent. Some games are negatively affected by the way the mClassic handles colours and brightness and then other games actually end up greatly benefiting from it. So while it’s very hit and miss here, it might be worth trying it out on a game by game basis.
Xbox 360
The Xbox 360 is obviously very similar to the PS3 graphically, so I went into this with reasonably high expectations.
However, every game I tested here didn’t really look any different at all.
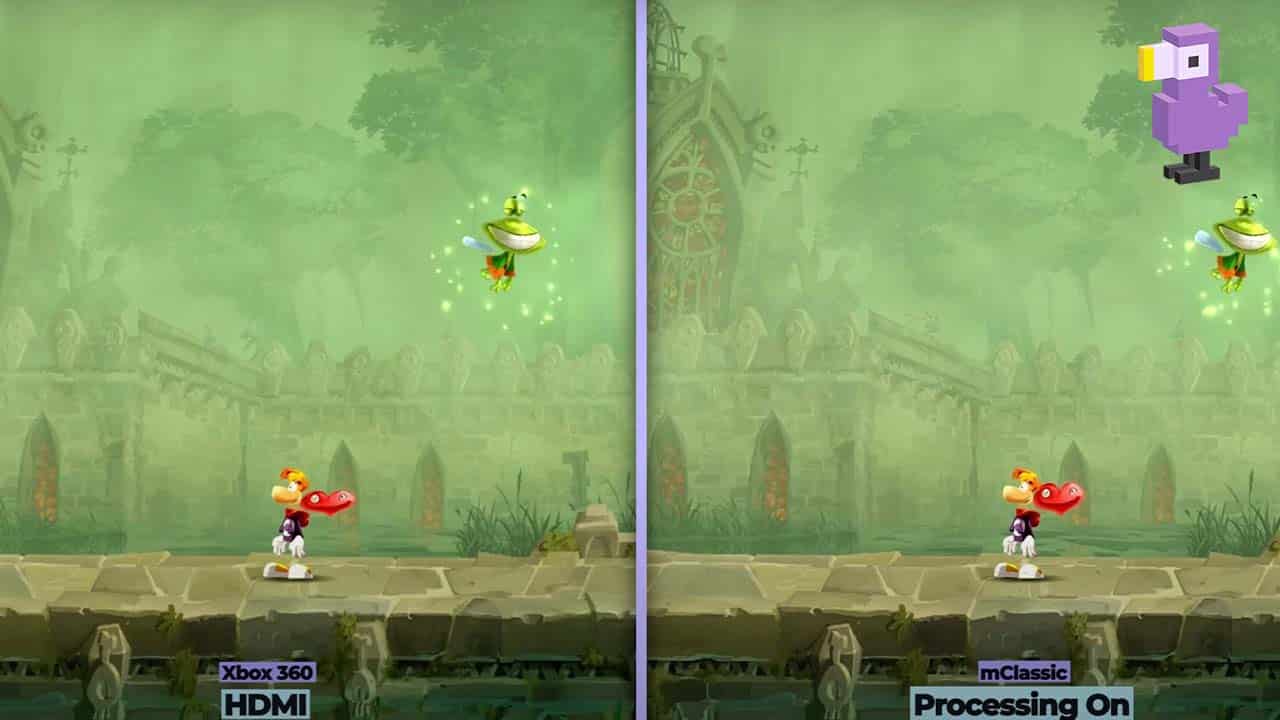
I tried Rayman Legends which literally looked identical with or without the mClassic, although to be fair this game does run at 1080p even on the Xbox 360 so that could be why it’s not doing much.
But then I tested some 720p games like Halo: Anniversary which to me looks exactly the same, Dead Rising maybe looks ever so slightly darker through the mClassic, but as far as I can tell it looks exactly the same quality-wise and then I did one last test with Halo 3: ODST and again, surprise surprise, it looked almost identical.
Maybe this is just me, if you’re looking at this footage and you can see a difference then definitely let me know. But for me, the difference the mClassic makes to the Xbox 360 is so minimal that it’s just not worth it for this console.
But I know what you’re all asking, what about everyone’s favourite Nintendo console? The Wii U! Well you’re in luck because I’m one of three people who own a Wii U so we can actually give it a quick test!
Wii U
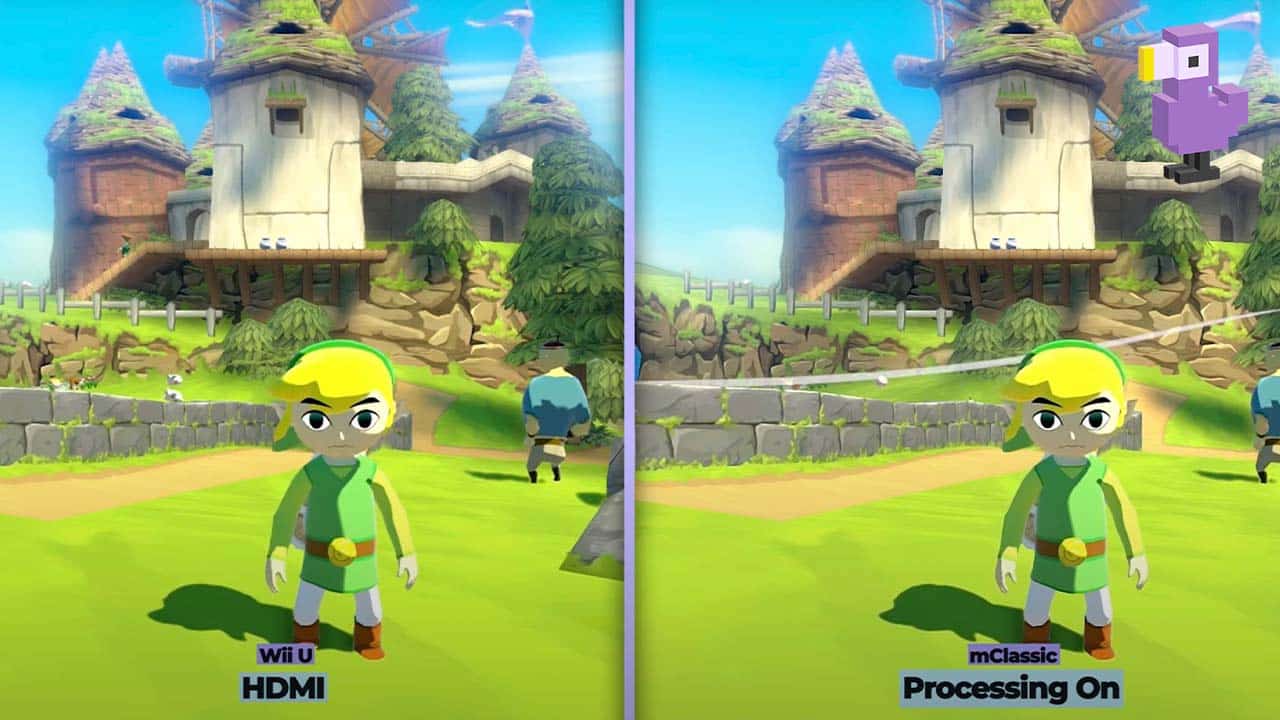
So first I wanted to look at The Legend of Zelda: The Wind Waker HD because not only is it one of the best looking Wii U games, but it’s also one of the few Wii U games that hasn’t been ported to the Switch.
As you can see though, there’s practically no difference and yes, the reason for this is that once again it runs at 1080p. I honestly thought that Wind Waker HD ran at 720p for some reason but apparently I’ve been misinformed. Maybe that’s why it still looks so damn good.
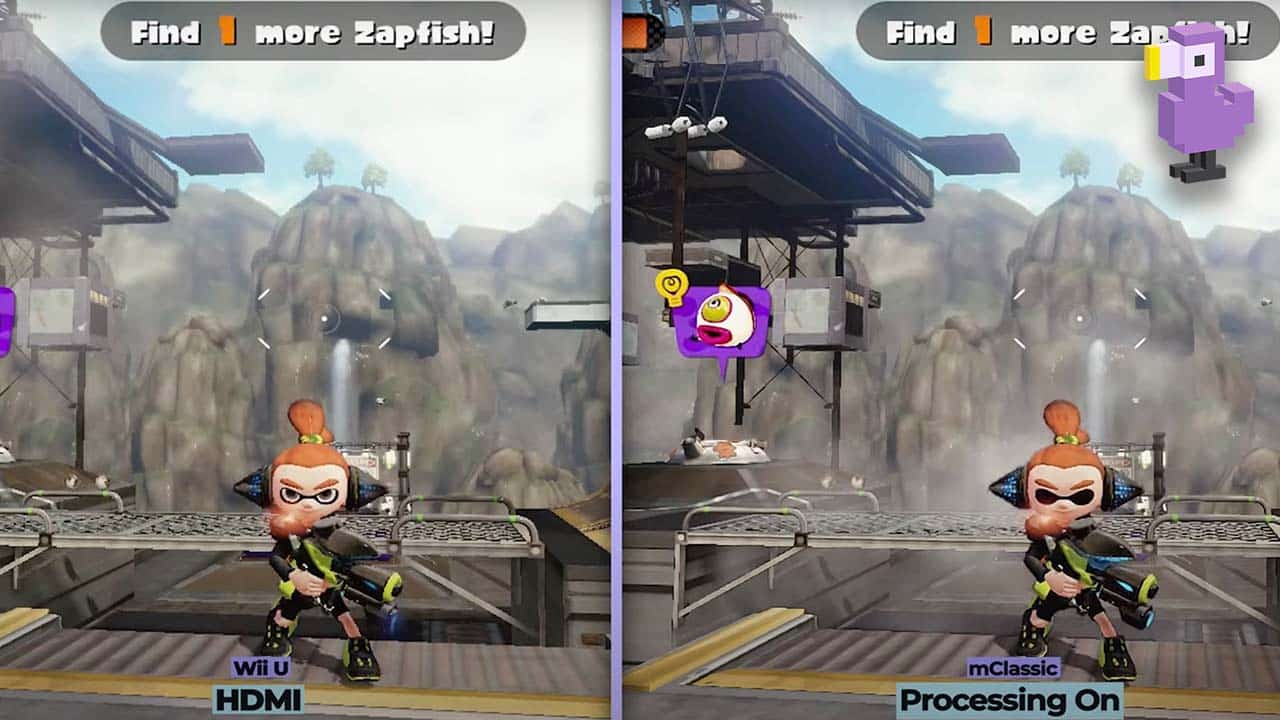
So let’s ignore that and move on to a game which runs at 720p with the original Splatoon! Once again the mClassic shows what it’s capable of with a 720p signal because here you can see some level of improvement. It looks a bit sharper overall with the mClassic and if we zoom in to my Inkling’s glorious hairline, we can see that the Wii U’s video output is much more jagged than the mClassic output. Once again it isn’t a huge difference, but it does definitely look better.
So for any 720p Wii U games, the mClassic could very well come in handy!
But we aren’t quite done yet. We love retro games here and I wouldn’t have done my duty if I didn’t see what this could do with some older consoles too! So let’s quickly blast through some classic systems!
Testing The mClassic HDMI Upscaler With Our Favourite Early Consoles
The effect you get from older systems is going to vary dramatically based on what console you’re using. I tested it with PS1 and PS2 games and there’s literally no difference in the majority of them.
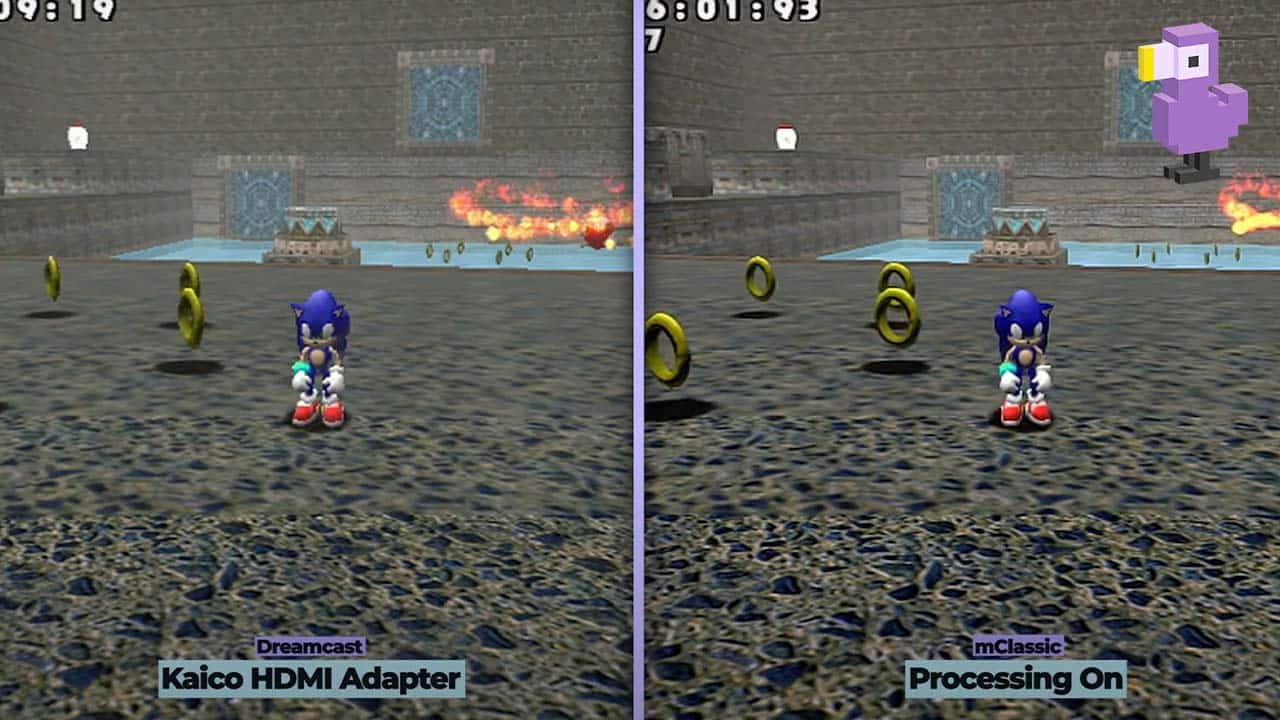
However, if we move over to the Dreamcast, there’s actually a fairly big difference. Here’s the raw video from the Dreamcast and here’s the video from the mClassic. The mClassic is pretty dramatically improving the image in terms of sharpness, contrast and it’s doing a great job at cleaning up the jagged edges.
The reason that the mClassic is improving the Dreamcast so dramatically and not having an effect on the PS2 is down to the mClassic not supporting interlaced video signals which the PS2 typically outputs. It will display the image, but it won’t be applying any of it’s upscaling or additional features, basically acting as a passthrough even in it’s ‘Processing On’ mode.
The Dreamcast meanwhile is capable of progressive video output which does work with the mClassic, so in most instances I wouldn’t recommend the mClassic for PS2. There are certain games which output in 480p, but a massive majority of games were incapable of this and instead ran in 480i.
The bottom line is that any console which outputs an interlaced signal (which is most consoles prior to the Dreamcast) won’t be upscaled by the mClassic without an additional device, whereas any progressive signal (offered by most consoles after the Dreamcast) will receive the effects of the mClassic and typically look much better.
Our Verdict On The mClassic HDMI Upscaler
So, would I recommend the mClassic?
Well, I would, but I’d definitely say that this is a bit of a niche product aimed at perfectionists who want to get the absolute best video quality they possibly can from very specific consoles and games.
This is a premium device aimed at people who want as much customisation over their console’s HDMI video output as possible. If you’re not all too bothered about that and think that the games on PS3, Switch and Dreamcast already look great, then this probably wouldn’t be worth it.
But when the mClassic works, it really works. It’s just unfortunate that there’s many different caveats that come with this particular device which limit how you can use it. If you have a monitor or TV which supports a 1440p video signal then it’s highly likely that you’ll see an even more dramatic difference in quality than what I’ve been showcasing.
For 4K upscaling though, I would look elsewhere because this is severely limited by only offering 30fps in 4K.
However, if you play a lot of games in 720p especially on the Switch which is where the mClassic seems to shine, this does legitimately make a difference.
Going back to those Super Mario Odyssey comparisons, the difference in quality here is night and day, so if you’re wanting to revisit any games which run at 720p or have crazy dynamic resolutions, then this is could be a great investment.
And that wraps up my thoughts on the mClassic! Does this look like something that would interest you? Which of the games I showcased in the video at the top of this article were you most impressed with? Let us know in the YouTube comments!


